Using Ghidra on MSVC WIN32 binaries

To develop binaries for Windows it is very common to use Visual Studio along with the MSVC compiler and linker. Visual Studio does a few things under the hood to convert a small C or C++ program into a secure and optimized binary. To understand this we will look into some of these things as well as WIN32 API specifics you might come across and how to detect them.

Calling conventions

When calling a method the arguments need to be passed to it. You can read more details about this in the Wikipedia X86 calling conventions article, but the most common ones to find in a binary are:

  • cdecl

    This is commonly used by static class methods (i.e. anything that does not touch the state of the instance). It i also used by most C methods as well as methods outside of any class.

  • stdcall

    The stdcall is used in most places on the Windows API, especially on methods imported from DLLs. It can be hard to distinguish from thiscall, not only for you but also for Ghidra. You see ECX an Stack as input and EAX as output.

  • thiscall

    As the name suggests its being primarly used on classes and for most of the cases you can assume identical behaviour like stdcall. Ghidra takes care for type management for you of the this pointer, which is really nice. The this pointer is in ECX, the arguments on the Stack and EAX is the output.

Fill out imported functions

Ghidra already comes with a great set of function defitions. It covers much of the WIN32 API for different Versions of Visual Studio. You can find the official set at ghidra-data on github. Functions that are missing but imported, you can easily add these to your project. A great reference is to use the WINE source code which offers them in convenient and readable header files.

Let’s examine this by taking a look at DirectDrawCreate. When importing a binary referencing this, Ghidra does not know about the calling conventions and parameters, so you can see the name but nothing else

DirectDrawCreate before it is filled

In the next step go ahead an fill out the function definition. This one was taken from wine’s ddraw.h.

Filling DirectDrawCreate

You can finally see which parameters get passed to a function as well as the appropriate return code. Please note that you might need structure and type defintions. During working on this example I’ve created a library with the necessary types for DirectDraw, Direct3D and Direct3D9. You can find my type definitions on github.com/egore/ghidra-data.

DirectDrawCreate after it is filled

Typing GetProcAddress and LoadLibrary

On Windows you can easily reference functions from a third party DLL by using LoadLibrary and GetProcAddress. In the example below you can see the loading and immediate use of this functionality. Before defining an appropriate type for the global DAT_XXXXXXXX fields, the code is hardly readable:

MessageBoxA and friends before defining GetProcAddress types

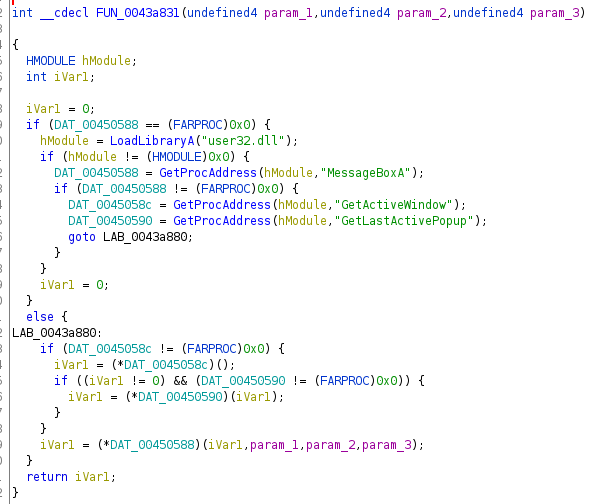
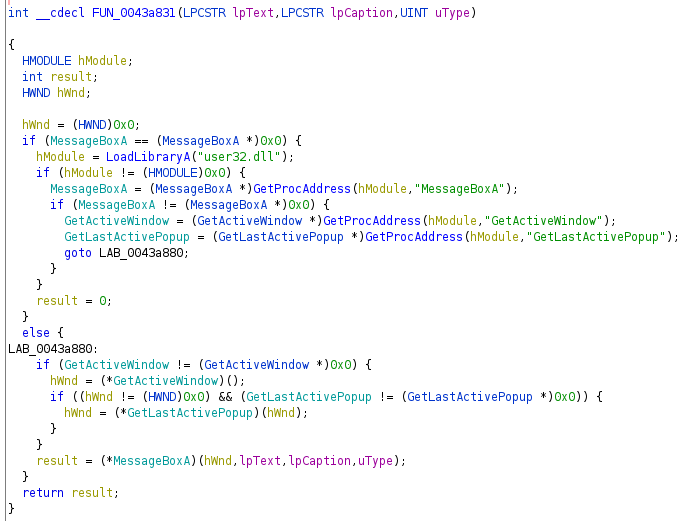
Only renaming the fields already alows better recognition. Combined with typing the to the Ghidra provided function definitions (e.g. “GetActiveWindow*” for GetActiveWindow), it make the code easily readable. One can quickly glance that this will invoke MessageBoxA from user32.dll on the active window or the last active popup.

MessageBoxA and friends aft defining GetProcAddress types

Anyone familiar with the Magic added by the CRT might be able to recognize this function: it is the error path when something horribly went wrong to display an error before the program exits.

C++

Compiled C++ brings its own share of complexity, especially in understanding what is happening in regards of dynamic_cast and virtual methods. First of all in many cases the Ghidra-Cpp-Class-Analyzer does an incredibly good job at identifying Class and their virtual function tables. I will recommend a few patterns below to identify and add classes that were missed or only recreated incompletly by the plugin.

operator_new

In nost cases you can look for a method named operator_new. Behind the scenes it is just a wrapper around malloc (or __nh_malloc and HeapAlloc due to the CRT magic), but it is recognized by Ghidra most of the time. In case it is not (e.g. when reverse engineering binaries from the last millenium) you can identify it yourself pretty easily. Once you found it, you will see it in a very common usage:

Usage of operator_new

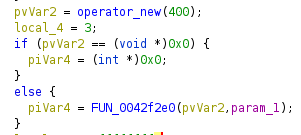
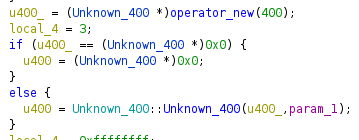
In the example you will see a memory allocation of 400 bytes. if this allocation was performed successful, it will immediately be passed to a function, which very likely is the constructor. As we don’t know the purpose of this class yet, I named it “Unknown_400” to indicate that it is unknown to me but has 400 bytes. I also renamed the method to look like a constructor.

Usage of operator_new after creating class and structure

Virtual function tables (vtables, vftables, _vfptr)

When looking further at the constructor you will see a common pattern:

  • super class constructors are called (or inlined, which is really common)
  • the virtual function table is set up
  • the member fields are initialized

In our Unknown_400 example we can see exactly what was described above.

Constructor before cleaning it up

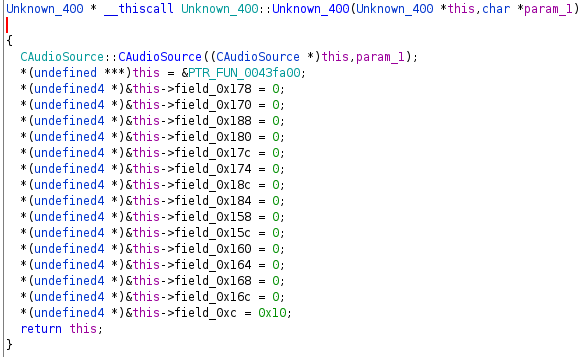
This gives away that PTR_FUN_0043fa00 is likely a function table, and indeed it is: a list of functions from which the first one got a label by Ghidra (i.e. 
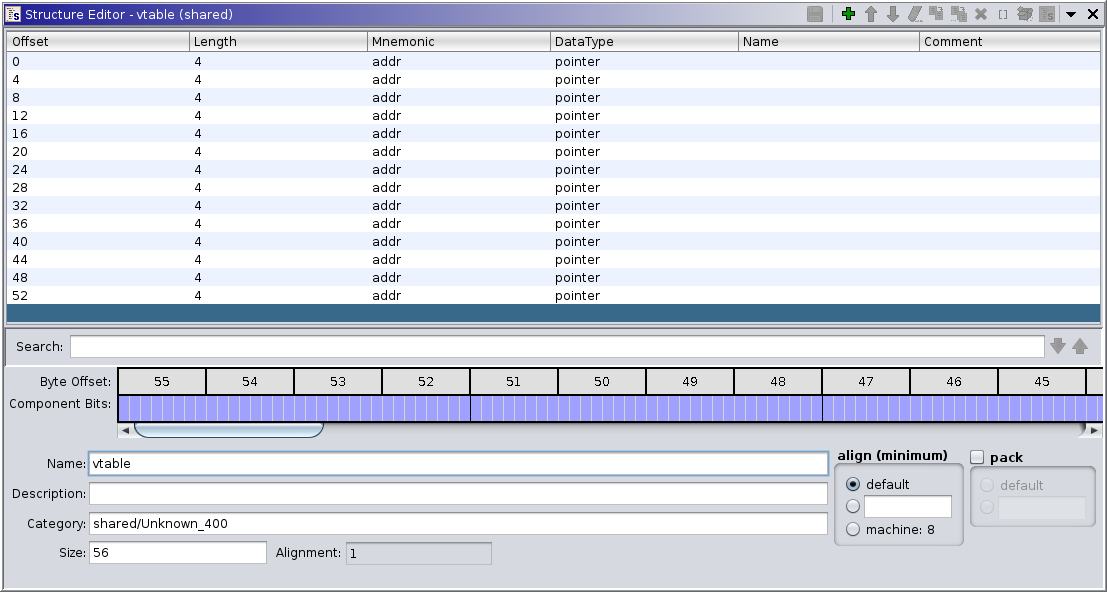
it is referenced by address somewhere). I usually go ahead and mock the vtable by a list of pointers which works really nice in Ghidras decompiler as it keeps the display of the return value as well as the arguments (do not define the list entries as undefined4 or even int, which prevents the decompiler from proper diplay).

Definition of the Unknown_400 vtable

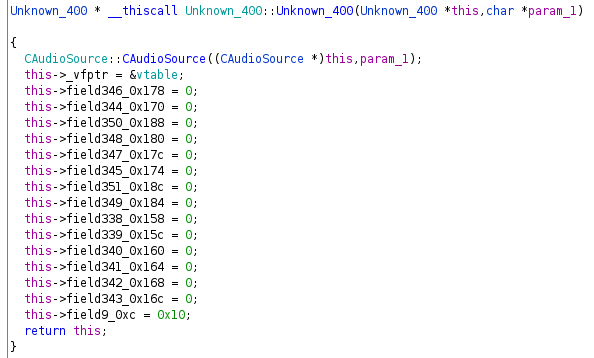
Using “Auto Fill in Class Structure” we end up with a pretty decent looking constructor:

Constructor after cleaning it up

Using the referenced to the vtable you can also find the destructor, which likely is also the first member pointer of the vtable. The destructor will do what the constructor did in reverse:

  • set up the vtable to our own (in case it was overwritten by a child class)
  • clean up the fields
  • call the super class destructor (or have it inlined)

IUnknown

The IUnknown interface is used in the WIN32 API to pass along objects of a size unknown to the caller, but with a known API. It differs from a normal C++ class definition in that way you don’t know anything about member variables.

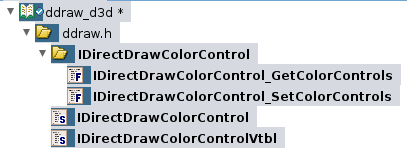
If we look at the example of IDirectDrawColorControl from WINE

Usage of the IUnknown interface by IDirectDrawColorControl

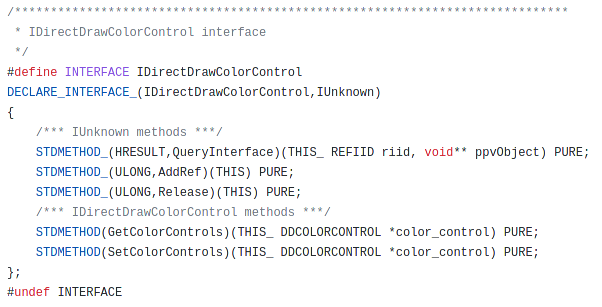
It inherites from IUnknown and brings alone two methods. To represent this in Ghidra I will do what is shown below. First of all I create the necessary interface IDirectDrawColorControl plus an empty IDirectDrawColorControlVtbl being referenced by the interface.

Structure for IDirectDrawColorControl

To fill the vtable I will create the according function defintions (if time permits, otherwise these will just be pointers) and add them. The first three methods are inherited from IUnknown to I simply reuse the IUnknownVtl provided by Ghidra.

Structures for IDirectDrawColorControl

Vtable for IDirectDrawColorControl

Please note that usually adding the function definitions takes a lot of time, as you will have to create additional structures, typedefs and interfaces as well. But for complex interfaces (e.g. IDirectDrawSurface vs. IDirectDrawSurface4 vs. IDirectDrawSurface7) it quickly becomes relevant.

Magic added by the CRT

When using Visual Studio it will take care to prevent you from programming errors by adding some magic to the C runtime (CRT). This magic is not visible in the code, but behind the scenes. Where it bit me the most was for file related APIs. I was used to think how fopen works. When looking at the disassembly of the file related APIs you will notice something different: the FILE passed to methods is not a simple file, but a __crt_stdio_stream_data. What this basically does is combining a the FILE handle with a CRITICAL_SECTION used for locking any file access. This is indeed a good idea with an acceptable performance overhead (I/O is more likely the slow part of a call, not some locking) and it easily prevents programming errors. Unfortunately you have to identify the inner workings of the methods first to identify these, as Ghidra 10.1 was not able to detect these and was also unaware of __crt_stdio_stream_data.

As mentioned above some other methods also behave differently. When looking at malloc for example, it uses __nh_malloc to allocate memory using the Windows HeapAlloc APIs. While this is totally fine, it also brings its own share of complexity to a binary.

Exception handling

Especially in C++ you have to be aware of magic behind the scenes for exception handling. On Windows you will see EH or SEH (structured exception handling) in place, which adds a bit of clutter to methods.

Indications for exception handling

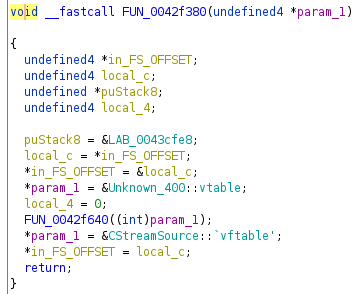
Whenever I see in_FS_OFFSET, local_c puStack8 and local_4 in a decompiled method, I just ignore it as my focus is on the “happy path”, i.e. whenever the program does not throw an exception. As far as I am aware there is no coverage on the topic and the Ghidra decompiler does not yet add the syntactic sugar to make this readable (see Ghidra issue tracker 2477).

/GS Buffer Security Check

When a program is compiled using the compiler option /GS, you will find a bit of magic on each and every method which utilizes the stack (i.e. almost everything). You can spot this by looking into ___security_init_cookie, which sets up a global variable I usually call SECURITY_COOKIE. In the methods you will see an added prolog:

/GS prolog

And epilog:

/GS epilog

Magic added by thirdparty DLLs

It sometimes happens that some code parts behave way different than others. This usually boils down to them being authored by someone else, using different standards and patterns. It is common to have several methods logging using OutputDebugString, while others do so using fprintf.

In very obscure code paths you will stumble upon behaviour hard to explain. One example you should always keep in mind is that C and C++ is preprocessor based. You can do really funky things like writing your own allocator and do the following

#undef new
#define new MY_WAY_BETTER_ALLOCATOR

Depending on the scope this will not only alter your own code, but also apply to others.

Reverse engineering with Ghidra 101

When looking at the assembly of an unknown binary you are usually welcomed with a lot of information. Even a small binary of a couple of kilobytes contains lots and lots of instructions itself, and likely relies on external information (DLLs, assets, operating system calls, etc.). The obvious question is: Where do I start?

Where to start

For reverse engineering I rely mostly on Ghidra. It comes along with a good set of features and its UI is great even for beginners. In my specific example I wanted to understand the format if the file SPELL.BIN from Spellbinder: The Nexus Conflict Demo. This file contains the spells, effect, runes used by the game logic. The file itself is just the assets, and some DLL or EXE must be parsing it to use in game. So let’s start with identifying our target: Where is the code probably located?

Locating your binary

In case of the Spellbinder Demo we have 2 relevant files:

  1. spell.exe
  2. game.dll

The first one is just about 90 KB, the later about 1.7 MB. As the demo already came with an auto updater, I took the assumption that all of the game logic must be in game.dll, so it can be replaced by the update. Also spell.exe does not reference the game.dll via the static linker, so it can perform modifications to the file game.dll before loading.

Importing your binary

The first important step is to import your binary properly. Try to provide all the DLLs referenced by the target available in the library paths. An example for game.dll can be seen in the screen below:

Library paths

Using this you quickly gain insights on what third party components your target relies on. In the example seen here you can see it relies on DDRAW.DLL, which quickly indicates it likely uses Direct Draw for rendering. So if you are interested in the rendering stack, you’d know what to look for.

Referenced DLLs

Analyzing the binary

When opening the CodeBrowser on your target for the first time, Ghidra will ask you to perform an analysis for you. Do so! Select whichever analyzers you prefer. I usually go with all of them, except for “Agressive Instruction Finder” and “MS DIA-SDK”.

Scoping your analysis

Now you are at the point of manual labour. The most important thing is to keep the scope down as much as possible. You will likely never understand everything that happens inside binary, but the good thing is: you don’t have to. I am interested in reading spell.bin, so likely the filename occures in the code. Searching for it we found it as string constant:

spell.bin occurences

The references all pass it into FUN_0045ede0, which seems to be the method to load Spellbinders BIN files. Let’s rename this method to LoadSpellBinFile. All occurences get passed the same constant string, so even if it could do more, it’s only used to read the spell.bin file. Intrestingly I found an additional method FUN_004571d0 which gets passed a spell.dat, which seems to be the same in a different format.

Identifying datastructures

In our method LoadSpellBinFile we see lots of local data, as to be seen in the following screenshot:

datastructures

Ghidra is able to generate datastructures automatically, but for now we’ll do it manually. The first datastructure being used is at puVar2, which is the same as ppuVar11, which is the same as ppuVar6. And where does this come from?

Identifying datastructures

We see a method getting passed 344 and returning a pointer, likely an allocation of 344 bytes. This is awesome: When looking at spell.bin we see a a nice pattern of 344 bytes in size. So what happens to these allocated bytes? When the allocation worked, the pointer gets assigned PTR_LAB_0056f458. What is that supposed to be? Likely a virtual function table. So this might be object oriented code after all, which is either not (yet) detected as C++ or some other object oriented framework on top of C.

Vtables - Virtual function tables

So we’ve figured that PTR_LAB_0056f458 is a Vtable. Now we need to assign a proper type to it:

344 Vtable

Once this is in place (you need to create the necessary function definitions for it), the memory at 0056f458 will look like this:

344 static vtable

Using your newly created Vtbl you can also create a matching structure to hold it:

344 Vtable usage

Unfortunately the code of LoadSpellBinFile does not reveal what individual fields of our newly created struct mean. We can see that it is likely chunks of 4 bytes, but that’s pretty much it.

Stepping back instead of diving to deep

Do you remember that FUN_004571d0 working in a similar area, likely reading the spells in a different format? It’s only called once so I renamed it to LoadSpellDatFile. Opening this method shows it is working with the same structures as LoadSpellBinFile. And it’s using lots of string constants:

  • “Loading Spell #%d\n”
  • “Error Loading ’type’ from section ‘%s’ file: %s\n”

This immediately gains us more insights. Once we told Ghidra piVar5 is a pointer to the 344 bytes large structure, it will show us that field 0x1c is fatigue. The format of spell.dat seems to be an .ini based format.

344 Fields

Now the real gruntwork happens, to name each field and do the same steps as above for other data structures.

Further hints

If your interest is reading files, look for methods specific to it. E.g. to read files you need to open them first. On WIN32 based applications you’d usually use OpenFile for this. So browsing the imports we find the following:

OpenFile

Using the references to the function you will find the places that, well, open a file.

In this specific example there are two occurences, both in FUN_00516b60. After renaming local variables to get a better understanding of the code, this is what the code looks like:

FUN_00516b60

It tries to read at least 768 bytes, and if that is not the case it will return. So we figured that _read is used to load data. We also learned that FUN_00535f80 allocated memory (or provides access to already allocated memory). As the memory is not released in the method, the method FUN_00535f80 likely keeps track of it.

It is also worth noticing that there are other methods to read files like ReadFile.

GetProcAddress

Another thing to keep in mind is not everything is statically or dynamically linked. Sometimes DLLs are loaded in program code. You should always check for references to GetProcAddress. This gains insights on the actual methods being hidden behind pointers. In the example of game.dll all socket related methods can be provided by two different DLLs, and the code loads them as it prefers. So all network related code is hard to find until you assign a proper datatype and a proper name to the function pointers. In the example below closesocket has been properly assigned, while WSAAsyncSelect was not yet.

closesocket

hashCode()/equals() using lambdas

Writing proper hashCode() and equals() methods is really important, but a pretty boring task. Luckily IDEs nowadays generate these, so we don’t have to worry about them too much. But this approach has two downsides:

  1. it adds at least 20 lines of complex looking code to often very simple classes (e.g. DTOs or JPA entities), which reduces readability and might have a negative impact on static code analysis
  2. the IDEs take different approaches, so the code looks different for e.g. Eclipse and IntelliJ

Lambdas as an alternative

To simplify the process of generating hashCode() and equals() methods I thought about using Java 8 lambdas. This is the approach I came up with:

public class HashCodeEqualsBuilder {

    public static  int buildHashCode(T t, Function<? super T, ?>... functions) {
        final int prime = 31;
        int result = 1;
        for (Function<? super T, ?> f : functions) {
            Object o = f.apply(t);
            result = prime * result + ((o == null) ? 0 : o.hashCode());
        }
        return result;
    }

    public static  boolean isEqual(T t, Object obj, Function<? super T, ?>... functions) {
        if (t == obj) {
            return true;
        }
        if (obj == null) {
            return false;
        }
        if (t.getClass() != obj.getClass()) {
            return false;
        }
        T other = (T) obj;
        for (Function<? super T, ?> f : functions) {
            Object own = f.apply(t);
            Object foreign = f.apply(other);
            if (own == null) {
                if (foreign != null) {
                    return false;
                }
            } else if (!own.equals(foreign)) {
                return false;
            }
        }
        return true;
    }
}

To use it in a class (e.g. DTO) type the following:

@Override
public int hashCode() {
    return HashCodeEqualsBuilder.buildHashCode(this, MyClass::getA, MyClass::getB);
}

@Override
public boolean equals(Object obj) {
    return HashCodeEqualsBuilder.isEqual(this, obj, MyClass::getA, MyClass::getB);
}

Based on some microbenchmarks I did, the performance is equal to the autogenerated implementation (e.g. by Eclipse). I will start using this from now on and can recommend using this approach for two reasons:

  1. it does not add additional lines of code to your project that might pop up as uncovered by unit tests
  2. updating the implementation (if ever) must only happen at a single place

Hibernate, @Fetch(FetchMode.SUBSELECT) and accidentially loading a whole database into memory

This week I was facing a very suspicious performance issue with @Fetch(FetchMode.SUBSELECT) and Hibernate. Let’s imagine the following Entities

@Entity
public class Parent {
    @Fetch(FetchMode.SUBSELECT)
    private List children;
}

@Entity
public class Child {
    private String something;
}

This comes with the following logic:

for (int i = 0; i < parentCount; i += 10) {
    List tenParents = entityManager.createQuery("from Parent").setOffset(i).setMaxResults(10);
    for (Parent parent : tenParents) {
        for (Child child : parent.children) {
            System.out.println(child.something);
        }
    }
}

Long pause at the start

Don’t try to make to much sense from the code above. What it does is loading the Parent-entities in batches of 10 and print the childrens member variable ‘something’. This looks pretty straight forward but was causing a long pause when accessing the children relation of the first Parent-entity. It just didn’t make much sense. We took a look at the SQL statements generated by Hibernate:

SELECT ... FROM Parent LIMIT 0, 10

This is our manual query which loads 10 parents.

SELECT ... FROM Child WHERE parentId IN (SELECT id FROM Parent)

This one is … suspicous. It is the query which caused the program to stop for a while. And it got me thinking.

The magic of SUBSELECT

What Hibernate with SUBSELECT does for SUBSELECT is a pretty brilliant idea. When you load entites using Hibernate, it will remember which query you used to load the data. This query is used to lazily load the child entities. If you used query X to load the data, it will use the same query to load the children using the query X as subquery (i.e. “SELECT … FROM Y WHERE parentId in (X)”).

This is helpful in certain situations. One example is where Fetch.SELECT fails. Fetch.SELECT will load the subentities using the ID of the parent, i.e. “SELECT … FROM Y WHERE parentId = ?”. Combined with @BatchSize(size = 10) this will generate optimized queries like “SELECT … FROM Y WHERE parentId IN (?, ?, ?, …)”. Adding large batch sizes will generate more questionmarks. This forces Hibernate to transfer many IDs to the database server, where using a subselect might simply be faster (of course only if the SQL query used in the subselect is fast).

The issue with SUBSELECTs

The issue in my specific example is: While Hibernate remembers the query used to load the data, it does not remember offset and maxResults! In my case this caused to load more that 1 million Children just to access a few of them in one batch. While it is correct behavior, it will consume a lot of memory which might be unexpected. If this is combined with flushes to the entity manager in the loops above, Hibernate will load the data multiple times.

My solution

In my case switching to @Fetch(FetchMode.SELECT) with @BatchSize was the best solution. My batch size is small so sending a few IDs to the database does no harm.

DAO unit testing with junit and mockito

If it’s not tested, it’s broken. – Bruce Eckel

I’m a great fan of reliable software. And working in the software development industry I only want to create software that works as reliable as possible. In my opinion crashes in any software (or even worse: data loss) cause such a huge distrust from the user, it is likely to prevent him from using a software ever again. Ask yourself the question: Would you want to run a piece of software that crashes? I wouldn’t. That’s why I think that quality assurance and especially testing your software (and finding crashes before your user does) is the most important part of software development.

So how do we test software? As usual Wikipedia can tell you all about the different types of testing. As well as many blogs, tutorials and similar all around the internet. You can easily see: there is a large amount of ways to ensure the quality of your software. I’ll focus on a type of testing typically done by software developers: unit testing. Unit testing is done, as the name suggests, one a „unit“ of the software. What a unit is can vary based on usecases, types of software and even programming languages. In this example we will use Java classes and their methods as a unit. So let’s start with a trivial example unit, the SomeDao:

package de.egore911.test;

import javax.inject.Inject;
import javax.persistence.EntityManager;
import javax.persistence.Id;

public class SomeDao {
    public static class Some {
        @Id public Integer id;
    }

    @Inject private EntityManager em;

    protected EntityManager getEntityManager() { return em; }

    public Some comeGetSome(Integer id) {
        return getEntityManager().find(Some.class, id);
    }
}

We have a DAO (data access object) which is able to load entities of the type Some by their ID. The class itself uses CDI to inject the EntityManager instance. This is a very common type of class I’ve seen in lots of web projects, but how to test this unit? At first glance it depends on an injection framework, which needs an entity-manager, which needs a database, which needs dummy data. Any of these dependencies could cause the test to fail that should therefore not be part of this unit test (e.g. the database was not available). A unit should be self contained, external dependencies must be mocked. A mock is essentially a black box, which has a guaranteed output for a given input. So we need to have a mock object for the EntityManager, which does not actually need to be injected and also does not need a database. This is where Mockito comes into play to create this mock.

import javax.persistence.EntityManager;

import org.junit.jupiter.api.Assertions;
import org.junit.jupiter.api.Test;
import org.mockito.Mockito;

public class SomeDaoTest {

    @Test
    public void testComeGetSome() {
        // Given: A mock the EntityManager to return our dummy element
        Some dummy = new Some();
        EntityManager em = Mockito.mock(EntityManager.class);
        Mockito.when(em.find(Some.class, 1234)).thenReturn(dummy);

        // Also given: Our mocked SomeDao using our EntityManager and
        // allowing only the call to comeGetSome
        SomeDao someDao = Mockito.mock(SomeDao.class);
        Mockito.when(someDao.comeGetSome(1234)).thenCallRealMethod();
        Mockito.when(someDao.getEntityManager()).thenReturn(em);

        // Perform the actual test
        Assertions.assertSame(dummy, someDao.comeGetSome(1234));
        Assertions.assertNull(someDao.comeGetSome(4321));
    }
}

The example above kept simple and therefore the actual test code would not make much sense, as we only test our mock (as the actual DAO does not have any logic). Once the DAO has actual logic (e.g. parameter parsing or using the criteria API) it gets more interesting. First you mock an EntityManager that will return a dummy object when the EntityManager.find() method called. Then we make sure our mocked EntityManager is returned when SomeDao.getEntityManager() is called and also the real SomeDao.comeGetSome() is invoked. Of course all this could be done using reflection ourselves, but mockito does all the hard work for us.

To simplify this even further, you can also use Mockito features to inject mocks for you. The example below shows an equivalent implementation using the InjectMocks annotation.

import javax.persistence.EntityManager;

import org.junit.jupiter.api.Assertions;
import org.junit.jupiter.api.Test;
import org.junit.jupiter.api.extension.ExtendWith;
import org.mockito.InjectMocks;
import org.mockito.junit.jupiter.MockitoExtension;

@ExtendWith(MockitoExtension.class)
public class SomeDaoTest {

    @Mock
    private EntityManager em;

    @InjectMocks
    SomeDao someDao;

    @Test
    public void testComeGetSome() {
        // Given: Tell the mocked entitymanager to return our dummy element
        Some dummy = new Some();
        Mockito.when(em.find(Some.class, 1234)).thenReturn(dummy);
        Mockito.when(em.find(Some.class, Mockito.any(Integer.class))).thenReturn(null);

        // Perform the actual test
        Assertions.assertSame(dummy, someDao.comeGetSome(1234));
        Assertions.assertNull(someDao.comeGetSome(4321));
    }
}

How to create a Android file browser in 15 minutes

Android provides very useful components to create Apps very fast. That sounds like a marketing claim, does it? OK, let’s see if that acutally is true! Let’s create an Android file browser.

Let’s start off by create a default „Hello World“-App that will consist of a layout file and a matching activity. Knowning what we want to build we name the layout activity_list_files.xml and name the Activity ListFileActivity. If you are developing using eclipse the default layout editor will show up displaying your wonderful „Hello World“-App. Let’s start by replacing the layout using the following code:

<LinearLayout xmlns:android="https://schemas.android.com/apk/res/android"
  android:layout_width="match_parent" android:layout_height="match_parent">
  <ListView android:id="@android:id/list" android:layout_width="match_parent"
    android:layout_height="wrap_content" />
</LinearLayout>

Now you have a very simple layout which only consists of a single element, a ListView. The ListView will be the component displaying our files. That’s it? Yes it is! But how will it be populated with data? That’s where our activity comes into play.

public class ListFileActivity extends ListActivity {

  private String path;

  @Override
  protected void onCreate(Bundle savedInstanceState) {
    super.onCreate(savedInstanceState);
    setContentView(R.layout.activity_list_files);

    // Use the current directory as title
    path = "/";
    if (getIntent().hasExtra("path")) {
      path = getIntent().getStringExtra("path");
    }
    setTitle(path);

    // Read all files sorted into the values-array
    List values = new ArrayList();
    File dir = new File(path);
    if (!dir.canRead()) {
      setTitle(getTitle() + " (inaccessible)");
    }
    String[] list = dir.list();
    if (list != null) {
      for (String file : list) {
        if (!file.startsWith(".")) {
          values.add(file);
        }
      }
    }
    Collections.sort(values);

    // Put the data into the list
    ArrayAdapter adapter = new ArrayAdapter(this,
        android.R.layout.simple_list_item_2, android.R.id.text1, values);
    setListAdapter(adapter);
  }

  @Override
  protected void onListItemClick(ListView l, View v, int position, long id) {
    String filename = (String) getListAdapter().getItem(position);
    if (path.endsWith(File.separator)) {
      filename = path + filename;
    } else {
      filename = path + File.separator + filename;
    }
    if (new File(filename).isDirectory()) {
      Intent intent = new Intent(this, ListFileActivity.class);
      intent.putExtra("path", filename);
      startActivity(intent);
    } else {
      Toast.makeText(this, filename + " is not a directory", Toast.LENGTH_LONG).show();
    }
  }
}

Let’s take a closer look at the activity. First of all I’ll give a short overview of the thoughts behind this activity: The activity displays all files within a given path. If we switch the path, we switch to a new activity displaying all files within the given directory. Easy right? To achieve that we extend the ListActivity which provides us methods like getListAdapter(), setListAdapter() and onListItemClick() to interact with the list in our layout. So when our Activity is started by Android and onCreate gets called the first thing we do (after setting the layout) is: Set the path as our activitiy’s title. In the next step we are going to read all the files from the given path, but there’s a catch: Android locks several paths from being accessed by apps. This is intended and necessary to keep apps from spying on each other (the „/data“-folder for example contains all the databases from the apps, including stored credentials). For this reason we add a note to the title and we need to check if File.list() actually returns an array. The javadoc states that it will only return null if you called the method on a file, but it also is true for inaccessible directories.

The lower part of onCreate is also interesting. See how we create our data adapter? We use Android’s ArrayAdapter, which allows us to pass it a List and tell it how to render it. Really easy and actually suited for many needs. Finally the onListItemClick will launch a new instance of our ListFileActivity to display another folder. Using the back button on your device will get you back to the previous folder.

You can see that creating a very simple file browser can be done in a very short amount of time and using very few lines of code. Of course this could be improved a lot (e.g. a proper UX concept) but there are already really good file browsers available on the Google Play store (and it would take way more than 15 minutes to match their features).

Thanks to Simeon M. and Laurent T. for pointing out minor typos!

Postfix Relay pro Absender

Für den zuvor beschriebenen Mailserver wird neben dem Empfang natürlich auch der Versand benötigt. Bisher hatte ich meine E-Mail-Clients so eingestellt, dass sie beim Versand direkt an den E-Mail-Server der E-Mail-Adresse senden. Dies hat den Nachteil, dass man in jedem Client die Passwörter neu eingeben muss. Daher war die Idee einen zentralen Server auf Postfix-Basis auf dem gleichen Rechner wie dem IMAP-Server zu betreiben, der dann SMTP-Relay macht.

Dieses Setup hatte ich vor mehreren Jahren bereits ausprobiert und hatte die Annahme, dass die Einrichtung genauso funktioniert. Allerdings ist SMTP-Relay heute auf Grund des Spam-Aufkommens bedeutend restriktiver. So erlaubt z.B. der Mailserver der Domain „christophbrill.de“, das ausschließlich E-Mail mit Absenderadressen von „@christophbrill.de“ weitergereicht werden. Da ich auch im Besitz einer Freemail-Adresse bin, würden diese E-Mail immer abgelehnt. Also war die einzige Option einen Relay pro Absender zu verwenden. Glücklicherweise kann Postfix dies von Hause aus.

In der Datei /etc/postfix/main.cf wird zusätzlich folgendes benötigt

smtp_sender_dependent_authentication = yes
sender_dependent_relayhost_maps = hash:/etc/postfix/sender_relay
smtp_sasl_auth_enable = yes
smtp_sasl_password_maps = hash:/etc/postfix/passwd
smtp_sasl_security_options = noanonymous
smtp_sasl_mechanism_filter = plain, login

Damit wird das Relaying pro Sender aktiviert. Jetzt müssen natürlich noch die Absender und relayhosts konfiguriert werden. In der Datei /etc/postfix/sender_relay stehen dann Einträge der Form

emailadress1@irgend-ein-provider.de   smtp.irgend-ein-provider.de

und in der /etc/postfix/passwd stehen dann die zugehörigen Zugangsdaten

emailadress1@irgend-ein-provider.de   benutzername:passwort

Bei mir sind dabei folgende Fehler aufgetreten, die man in /var/log/mail.err:

fatal: open database /etc/postfix/sender_relay.db: No such file or directory

Das passiert dann, wenn man postmap hash:/etc/postfix/sender_relay noch nicht aufgerufen hat

Relay access denied

Dieser Fehler tritt auf, weil Postfix per Default in mynetworks nicht mein privates Netzwerk stehen hat und in der Standardkonfiguration nur Hosts aus dem privaten Netzwerk einen Relay machen dürfen.

SASL authentication failed; .... no mechanism available

Dieser Fehler tritt auf, weil Postfix per Default keinen SASL-Mechanismus vorgibt. Mit Hilfe des Parameters smtp_sasl_mechanism_filter lässt sich dies leicht steuern.

Alles in Allem war das SMTP-Relay in weniger als einer halben Stunde eingerichtet und funktioniert jetzt problemlos. Meine E-Mail Clients „reden“ jetzt nur noch mit dem zentralen Server, was den Konfigurationsaufwand pro Arbeitsplatz minimiert (ok, es ist nur Desktop-Rechner und ein Netbook, aber es geht ja ums Prinzip ;-).

Copyright © christophbrill.de, 2002-2025.